Kapotasana (Pigeon Pose)
What is Kapotasana?
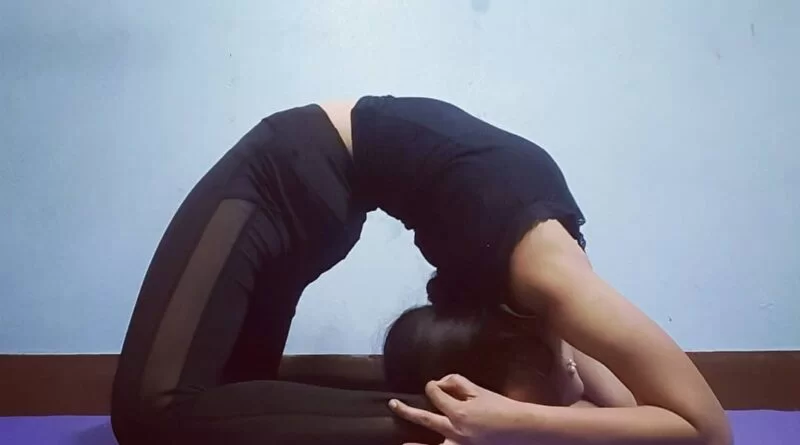
Kapotasana, also known as Pigeon practice, is a yoga practice that targets the thighs and hips. This position, intermediate to advanced in difficulty, requires strength and flexibility.
This is the most beneficial asana, which strengthens the back and opens up the midsection (chest). While strengthening the back and lengthening the thighs and groin, it also increases flexibility and opens the hip area.
A more thorough and effective body workout is Kapotasana, often known as Pigeon Pose. It enhances the quality of your abdomen area and legs. It is particularly helpful for people who suffer from the negative effects of foot issues. You may release tight hip flexors and thighs and condition your thighs with this position.
Which muscles are used in Kapotasana?
- Iliopsoas
- Pectineus
- Rectus femoris
- Quadriceps
- Gluteus Maximus
- Hamstrings
- Calves
- rectus abdominis
- Core muscles
- erector spinae
- latissimus dorsi
What are the Health Benefits of Kapotasana?
- The entire spine becomes more flexible when performing Kapotasana.
- Because it allows you to extend your limbs to their maximum length, Pigeon Pose increases your strength.
- stretches the thigh, groin, ankle, throat, chest, psoas, belly, and other muscles.
- A fantastic hip opener is Pigeon Pose.
- maintains the health of the body’s organs by activating them.
- Breathing is improved by stretching the diaphragm muscles.
- When a yogi performs kapotasana for an extended period, it promotes peace and spiritual benefits.
- The flow of prana increases as the chest and backbend expand.
- The pigeon stance is beneficial for women in general because it makes effective use of the pelvic floor muscles, which aids in reproduction.
What are the Preparatory Poses for Kapotasana?
One of the best pre-pigeon pose poses, particularly for those with tight hips, is the Eye of the Needle Pose.
- Ustrasana
- Camel Pose Variation Unsupported Arms
- Ardha Matsyendrasana I
- Locust Pose Variation
- Dhanurasana
- One-Legged King Pigeon Pose Iii
- Bridge Pose Variation Ankles
- Bridge Pose Variation Arms Support Legs Straight
- Matsyasana
- Supta Virasana
- Reclined Hero Pose Variation Elbows
- Laghu Vajrasana
How to do a Kapotasana?
- Depending on your anatomy, it could be near the inner or outside edge of your wrist, or just behind it.
- Try different approaches until you find one that gives you a stretch on the outside of your hip without causing you any knee pain.
- Somewhere in front of your left hip will be your right ankle.
- Point your toes and slide your left leg back so that your heel is facing toward the ceiling.
- Draw your legs nearer one another to scissor your hips together. If necessary, place some support beneath your right buttock to maintain your hips level.
- Pull your navel in, open your chest, come onto your fingertips, and lengthen your spine as you inhale.
- The mat can be used to support your forehead and forearms.
- Hold on for at least five breaths.
- Try to relax the stiffness in your right hip with each exhale.
- To get out of the posture, push back through your hands, lift your hips, and return your leg to all fours.
- Continue on the opposite side.
Kapotasana Video:
What are the Beginners’ Tips for Kapotasana?
- The outer hip may be severely stretched by this. When your shin is parallel to the front of the mat, the hip opener becomes more difficult.
- If your forehead does not reach the mat, use a block or stack your fists before placing it on them.
- You can also remain higher, resting on your hands or elbows, but keep in mind to protect your shoulders from sagging and maintain a soft base of the neck.
What are the Modifications and Variations for Kapotasana?
Modifications:
Take a few extra precautions and efforts to make the Pigeon posture more pleasant (and successful) for a beginner.
The leg bent in front of you should have its hip checked. Make sure you have enough cushioning beneath your butt on the side where the hip does not touch the floor. Use a block or more blankets if needed. It’s critical to maintain both hips square with the floor and divide your weight equally between them. Otherwise, you risk bending your spine and putting strain on your knee.
Make an effort to build a prop support system that will let you unwind in the forward bend.
Eye of the Needle, also known as Suchirandrasana, is a suitable alternative if the Pigeon pose isn’t comfortable for you.
Variations:
- Rather than dropping the head to rest on the mat, you can turn this into a back bend. Lift your chest while keeping a straight-arm posture.
- Try the variant shown in Figure Four. Bring your left foot closer to your hip to make the stretch longer.
- Figure Four can also be performed while lying on your back. Cross your right ankle over your left knee, then pull the back of your left leg towards you. Switch sides.
What are the types of Kapotasana?
- Classic Pigeon Pose
- King Pigeon Pose
- Sleeping Pigeon Pose
Classic and Resting Pigeon Pose
- Begin with a downward-facing dog stance on a yoga mat. Apply pressure to your hands and feet, straighten your legs, and raise your hips to the sky. Your body will be in a V shape that is upside down.
- Raise your right leg off the ground, then bring your right knee to the back of your wrist.
- Keep your left leg straight as it touches the floor as you bring your right leg to the mat.
- Make sure your right foot is dorsiflexed, or flexed toward the shin, and extend your right knee so it is farther to the right than your hips. As you slowly lower your right buttocks to the floor, keep your weight evenly spread across both hips. If this is too hard, place a folded towel beneath your right buttocks.
- To lengthen and straighten your spine, place both hands beneath your shoulders and apply little pressure to the palms of your hands. Feel the stretch as you stare straight ahead. You have now attained the Classic Pigeon Pose.
- Then, exhale deeply, bend your elbows slightly, and stretch your arms straight in front of you while lowering your chest over your right leg. Just extend forward as far as you feel comfortable if this makes you uncomfortable.
- In a relaxed position, gently pull your shoulders back from your ears.
- Take five to ten deep, calm breaths while maintaining this position.
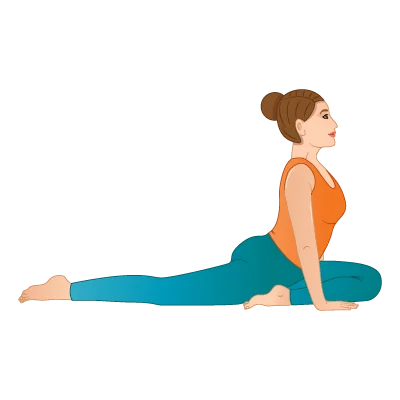
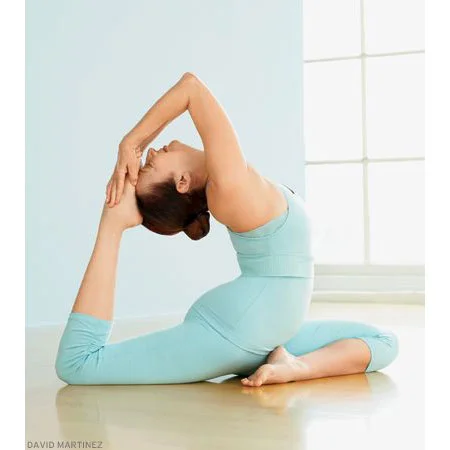
King Pigeon Pose:
- To get into Classic Pigeon Pose, follow the previous steps 1 through 5.
- Keep your toes pointing, or plantar flexed.
- Then raise your left hand in the air while gradually folding your elbow back, and grasping your left foot.
- You can look up and raise your chin a little but don’t bend your neck back.
- Take five to ten deep, calm breaths while maintaining this position.
- Continue on the opposite side.
Sleeping Pigeon Pose
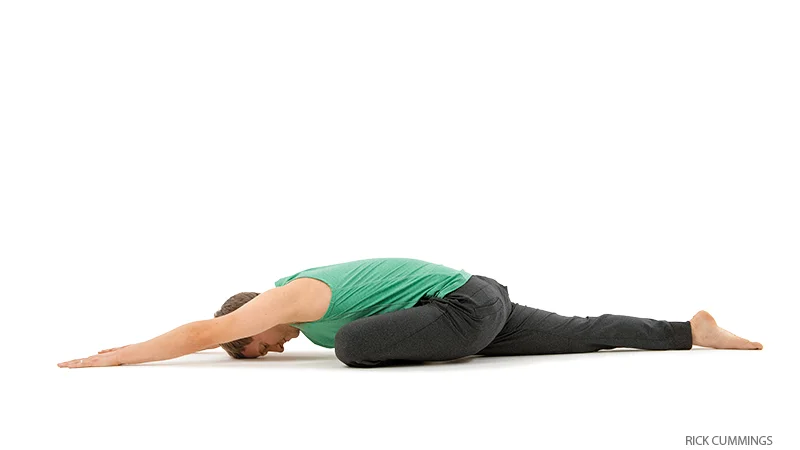
- Set up a tabletop position by positioning your hands squarely under your shoulders and your knees firmly under your hips.
- Until your right knee is an inch or two behind your right wrist, slide it forward.
- Keeping your hips square, place your hands on the floor in front of your right thigh.
- To engage your core muscles, bring your belly button closer to your spine.
- To release, gently bring your torso back into a straight position.
What is a Common Mistake you can’t make while in Kapotasana?
To maximize the benefits of the Pigeon position, steer clear of these mistakes.
Rotated Rear Leg
During the Pigeon stance, your back leg should be neutral rather than turned outward. To correct this, make your hips square by raising your thigh and tucking your toes beneath.
Hips Not Square
Avoid collapsing into the front bent knee’s hip. Maintain a square hip position and use padding if necessary.
What are the Contraindications for a Kapotasana?
- damage to the shoulders, neck, or spine.
- Insomnia
- Stiff back or a sore back.
- Migraine
- Hypertension
- Women who are pregnant or menstruating.
- Weak functions of any organ.
- Spondylitis
- Any kind of allergies related to breathing.
- Depression
Conclusion:
Although it requires patience, practice, and proper alignment, kapotasana, often known as “pigeon pose,” may be a transforming and fulfilling yoga pose. You can increase your strength, flexibility, and balance as well as enjoy the advantages of this posture in a secure and virtual environment by following the detailed instructions and helpful hints provided in this article.
Always be mindful of your body’s needs and limitations, and if you have any worries or medical conditions, consult a trained yoga instructor or other healthcare provider. Kapotasana can develop into a beautiful and empowering addition to your yoga practice with commitment and awareness.
FAQs
What are the benefits of kapotasana?
The entire spine becomes more flexible with kapotasana. Because it allows you to extend your limbs to their maximum length, Pigeon Pose increases your strength. Stretches the belly, psoas, thigh, groin, ankle, throat, and chest, among other muscles.
What is the procedure of kapotasana?
As you descend back, try to keep your thighs as perpendicular to the floor as you can. Lower your crown to the floor as well after placing your palms on the ground with your fingers pointed toward your feet. As much as you can, open your front groins by pressing your palms, raising your hips, and raising your head a little off the ground.
Can I do a pigeon pose in bed?
With your bed and pillows supporting you, this well-liked hip opener becomes even more accessible and comfortable. To make room for yourself, get down on your hands and knees toward the edge of the bed.
Is Kapotasana hard?
The Intermediate Series is difficult!
Most yogis find kapotasana to be the most difficult asana, and I know this to be true for me. It calls for extreme shoulder and upper back flexibility as well as a great deal of leg strength.
Is pigeon pose painful?
In Pigeon Pose, what should I do if my front knee hurts? When the hip is not completely externally rotated, the knee is attempting to take up the rotation, which is frequently indicated by pain in the front knee. Avoid doing this since it puts the knee at risk for damage.
References:
- EkhartYoga. (2024, January 24). How to do Pigeon pose / Eka Pada Rajakapotasana – Ekhart Yoga. Ekhart Yoga. https://www.ekhartyoga.com/resources/yoga-poses/pigeon-pose
- Pigeon Pose Yoga (Kapotasana) | Yoga Sequences, Benefits, Variations, and Sanskrit Pronunciation | Tummee.com. (2017, October 15). Tummee.com. https://www.tummee.com/yoga-poses/kapotasana
- JanviMangukiya, J. (2023, December 13). Kapotasana (Pigeon Pose) – Steps, Benefits, Variations – Mobile. Mobile Physiotherapy Clinic. https://mobilephysiotherapyclinic.in/kapotasana-pigeon-pose/#Benefits_of_pigeon_pose
- Ryt, A. P. (2024, May 10). How to Do Pigeon Pose in Yoga. Verywell Fit. https://www.verywellfit.com/pigeon-pose-eka-pada-rajakapotasana-3567103
- Cpt, K. D. M. R. (2021, March 4). Pigeon Pose: A How-To Guide. Healthline. https://www.healthline.com/health/fitness/pigeon-pose#how-to

