
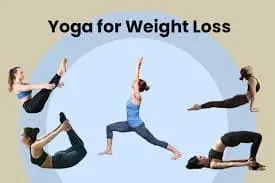
15 Best Yoga Exercise For Weight Loss
Introduction:
Since long ago, yoga has been practiced. It gives us methods and resources to live a life free from tension and stress. If you practice yoga correctly and with dedication, you can see results quickly. In addition to improving your emotional and physical well-being, it burns calories rapidly.
Through Yoga Exercise For Weight Loss, you may develop your physical, mental, and spiritual faculties and become the best version of yourself. Yoga’s more strenuous styles and the concentration that comes from a mild, calming practice may be particularly useful for weight loss.
These yoga poses will increase your flexibility, improve your metabolism, strengthen your core, and increase your stamina. You may speed up your weight reduction by releasing tense or inactive muscles with a series of twists, bends, and inversions.
How frequently is yoga recommended for weight loss?
Make an effort to engage in more vigorous, active practice for at least an hour three to five times a week. Alternate your practice with a gentler, more relaxed session on other days.
Take your time if you’re a novice. Practice for 20 minutes at first, then increase from there. By doing this, you can avoid injuries and increase your strength and flexibility. Give yourself a whole day off each week.
For extra cardiovascular benefits, mix your yoga practice with sports like swimming, cycling, or walking.
Advantages of regular yoga practice:
- Support for mental health
Taking some time for yourself could be a much-needed break for your mental health in addition to everything else in your life. You can maintain your stability in the face of difficulties by using the mental clarity you achieve on your yoga mat. It can be used to calm your nervous system and stress response, let go of the day, or release suppressed emotions. Additionally, yoga improves your sense of well-being and lowers stress, both of which promote better sleep.
- Increased mobility
Yoga may alleviate mobility issues by stretching and relaxing ligaments and allowing you to completely lose yourself in movements you have never been able to do before. Your choice of practice style will determine how much your mobility improves.
- Overall health
It maintains the health and mobility of your joints while strengthening your muscles. It also pulls your internal organs, nervous system, lymphatic system, and connective tissue into several dimensions to maintain their stamina and effectiveness. general health, and it all comes down to a small amount of regular exercise.
Best Yoga Poses For Weight Loss Video
Yoga Exercise For Weight Loss:
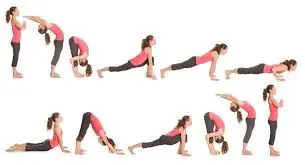
Surya Namaskar (Sun Salutation)
Steps of Surya Namaskar:
- Assume a position at the front edge of your yoga mat, keeping your feet close together.
- Breathe deeply, then raise both arms to the side.
- Bring your palms together and place them in front of your chest as though in prayer as you release the breath.
- Keep both hands touching each other as you raise your arms in the air and take another breath.
- Backwards, extend your arms and head.
- Near your ears, place your upper arms.
- From your fingers to your toes, try to stretch your complete body.
- Stretch your arms toward your toes while keeping your hips bent forward.
- When in this position, avoid hunching your back.
- On either side of the feet, place your arms.
- If you are unable to complete this step, bring your palms as close to your feet as you can.
- While maintaining this stance, slowly release your breath.
- Touch both of your palms to the floor while placing your right foot behind your feet.
- Stretch your right leg all the way to the point where your right foot and shin touch the ground.
- Look straight ahead without bending your neck, and keep your left foot planted.
- As you transition into this pose from the previous one, keep in mind to take a slow breath.
- Connect your left foot with your right foot after taking a step backward.
- Avoid bending your elbows and maintain a straight arm position.
- The weight of your body can be supported by using the palms and heels of both feet.
- Breathe normally the entire time.
- After lowering both knees to the floor at the same time, touch your chin and chest to the floor.
- To lift your buttocks a little, straighten your knees.
- Raise your chest off the floor while gripping it with both hands by bending your upper body backward.
- Lean your neck back so that it seems like it’s looking up at the ceiling.
- Stretch your arms toward the ceiling while lifting your hips.
- Your weight should be supported by both your foot’s palms and heels.
- Your body must have the form of an upside-down “V.”
- Touch both palms to the floor and put your right foot behind your feet.
- Stretch your right leg all the way to the point where your right foot and shin touch the ground.
- Look straight ahead without bending your neck, and keep your left foot planted.
- At the same time, bend forward from the waist and bring your arms up to your toes.
- Your arms should be positioned on either side of your feet.
- Try to bring your palms as close to your feet as you can if you are unable to complete this step.
- As you enter this stance, slowly exhale.
- Take another breath and raise your arms so that both palms are in contact with each other.
- Extend your arms and head back.
- Keep your upper arms near your ears.
- Try to stretch every part of your body, from your fingers to your toes.
- Maintain a straight back while bringing your arms to either side of your body.
- Keep your shoulders straight and your spine straight.
- Keep your knees and elbows straight, but maintain a comfortable stance.
- Then return to your neutral position.
- Then relax.
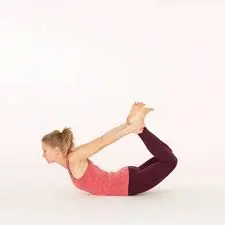
Dhanurasana (bow pose)
- Place your hands by your sides, palms up, while lying on your belly.
- Use your hands to grasp your ankles while bending your legs.
- Put pressure on your pubic bone and pull your lower abdomen up and in.
- Press your ankles into your hands while taking a breath to raise your thighs and chest.
- Your chest will open if you move your shoulder blades down and toward one another.
- Take a few deep breaths, focusing on your ribs and chest.
- As you exhale, let go of your ankles and lie down on your stomach for a few breaths.
- Then return to your neutral position.
- Then relax.
Konasana (Angle Pose)
- Place your feet comfortably apart as you stand.
- Distribute your weight evenly over both feet.
- As you take a breath, lift your arms over your head and connect your fingers in a form with your palms.
- Hold the arms close to the ears.
- Exhale, then bend to the right.
- Focus more on keeping the feet planted securely on the floor, bending the elbows, and moving the pelvis to the left.
- Calm down and experience the side stretch as you remain in this position.
- Continue taking slow, deep breaths.
- Breathe deeply and then get back up.
- Release the breath and lower your arms.
- Then return to your neutral position.
- Then relax.
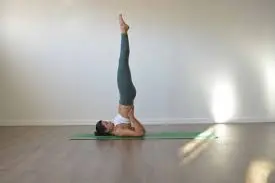
Sarvangasana (Shoulder stand)
- Let’s begin by lying down on the ground.
- Either knees bent or legs extended.
- The hands are by your sides, palms facing down.
- When you release your breath, push your lower back onto the floor.
- As you take a breath, raise your legs and press your arms and hands into the floor.
- Using your progress, lift your legs over your head and then extend your hips up and off the floor.
- Your shoulders and upper back take on more weight when you lie on your back.
- You should place your elbows level with the floor and keep your hands behind your back.
- Extend your legs toward the ceiling.
- To help elevate your spine off the floor, walk your hands up your back toward the upper back and draw your elbows in closer to one another.
- Inhale and pull your shoulder blades in.
- Keep the majority of your weight on your arms and upper back and slightly pull your thighs toward one another.
- Calm your face and throat, look at your chest, and direct your breathing to your abdomen.
- If you would like, you can increase the duration from the initial 30-second period of time spent in this stance.
- To get out, drop your legs at a 45-degree angle toward the ground.
- After that, gradually roll your spine back to the floor, bending your knees if you’d like, and finally plant your feet there.
- Then return to your neutral position.
- Then relax.
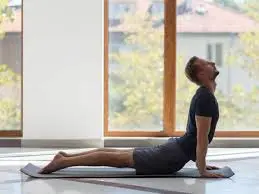
Bhujangasana (Cobra Pose)
To do Bhujangasana:
- Start by assuming a prone position on the surface of the ground.
- Get your legs moving and squeeze your stomach in.
- Take a deep breath and raise your chest from the back of your heart.
- Pull the collarbones up, stretching them slightly down the spine, and firmly press the shoulder blades into the upper back.
- Last, raise your head.
- Hold your hands without weight and keep your chest open.
- Stretch, exhale, then drop again through the toes.
- Then return to your neutral position.
- Then relax.
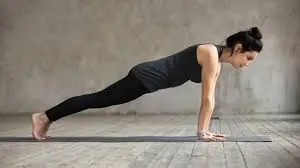
Plank pose
- On all fours, lift your shoulders over your wrists with your fingers wide and your middle finger pointing forward.
- Place your hands on the floor and gently press your upper arms down.
- Inhale and lift the lower abdomen.
- With your toes curled in, stretch one leg back, then the other leg, to complete a high push-up.
- Head to heels, so that you’re in an upright position.
- To press the space between your shoulder blades upward toward the ceiling, push them firmly into the back and slide them down along the spine.
- To stretch the tailbone toward your heels, contract your thigh muscles.
- Consider using your palms to properly press the floor up while you push your heels back toward a wall.
- It is necessary to bring the legs together without moving them.
- Stability and core strength have been improved as a result.
- With your jaw relaxed, look forward a little at the floor.
- The breathing is consistent and moderate.
- This pose can be maintained for five breaths or a few minutes.
- Then return to your neutral position.
- Then relax.
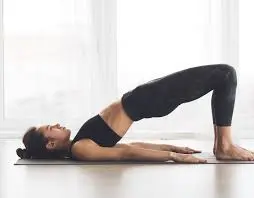
Setu Bandhasana (Bridge Pose)
- Lay on your back on the floor to start.
- Next, flex both knees.
- Make sure your feet are planted firmly on the floor and near enough to your glutes.
- If there is any space between your spine and the ground, squeeze your lower back into the floor with your core.
- As you take a breath, push through your feet and start raising your hips toward the ceiling, one at a time, to raise your spine off the ground.
- Maintain parallel thigh and hip-aligned knees while making sure your head, neck, and shoulders are flat on the ground.
- Use your inner thighs to provide support.
- If it seems comfortable, you can keep your hips rising while staying on top of your shoulders by pressing your arms into the mat and grasping your hands beneath your back.
- Ensure that your knees are exactly above your heels.
- To maintain the pose for a few seconds concentrate on taking deep, regular breaths and using your core and glutes.
- To preserve alignment, keep your chin slightly tucked in to protect your neck and refrain from twisting your head while in the posture.
- Always exhale and slowly drop your spine back to the ground until your hips are comfortably resting on the floor to release.
- Then return to your neutral position.
- Then relax.
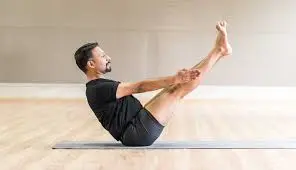
Boat pose (Naukasana)
- Make sure you are comfortable sitting on the floor initially.
- Next, bend both knees.
- As you inhale, place your hands behind your knees and raise your chest, using your back muscles.
- Pull your lower abdomen up and in by using your inner thighs.
- Raise your feet to knee height, toes spread, and lean back on the back of your sitting bones.
- Stretch your legs to go farther.
- Hold this position for a few seconds.
- Then return to your neutral position.
- Then relax.
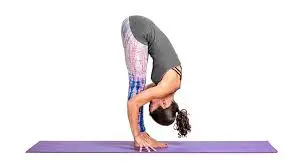
Uttanasana (forward bend pose while standing)
- Begin by standing tall and maintaining your entire body in a straight line and alignment.
- As you take a breath, lift your hands and lengthen your back to make space for a forward bend.
- When you exhale, your shoulders try to slide between your shin bones, pressing against your knees and forehead.
- Reach your hands forward and down on the floor next to or behind your heels flat.
- Hold this posture for a few seconds.
- Then return to your neutral position.
- Then relax.
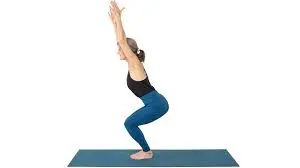
Utkatasana (Chair pose)
- You should begin standing on the floor.
- You can take a breath by lifting your arms above your head and facing the ceiling.
- Let out a breath and bend your knees like you were going to sit on a chair.
- Raise your arms to the sky while maintaining a low, relaxed posture.
- Hold this position for a few seconds.
- Drop your arms and lengthen your legs to release pose.
- Then return to your neutral position.
- Then relax.
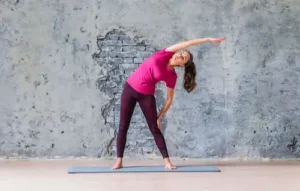
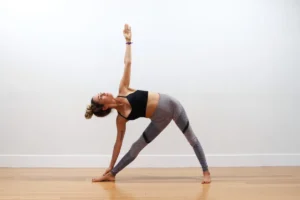
Trikonasana (Triangular pose)
- To begin the Triangle pose, also called Trikonasana, stand facing the extended end of your mat and set your feet about leg-distance apart.
- Make a 45-degree turn with your left foot and your right foot out.
- You want to be stable through both legs.
- Roll your right thigh out until your right knee is parallel to your first two toes while keeping your legs engaged.
- Extend through both sides of the waist, pull your lower abdomen in and up, and raise your arms parallel to the floor.
- As you spread your body over your right leg and move your hips toward the center of the mat, take a deep breath.
- As you lower your right arm and place your hand on a block, the floor, or the leg, release your breath.
- Lift your left arm straight up to the ceiling, keeping it parallel to your shoulder and palm facing ahead.
- Expand across the sides of the neck while keeping the neck in line with the spine.
- Look straight ahead or tuck your chin in a little and look up at your left hand.
- As you continue to rotate your ribs, press through your feet, and extend through your fingers and crown of the head, maintain a calm face and take slow, deep breaths.
- Press your feet firmly into the floor, take a breath, and raise your left arm to the ceiling as you straighten up.
- Turn around and take the opposite motion.
- Then return to your neutral position.
- Then relax.
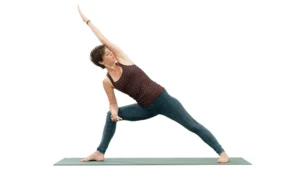
Utthita Parshvakonasana (Extended Side Angle Pose)
- Begin by standing securely on the ground.
- When you inhale, ensure that your thigh is parallel to the floor and your right knee is above your ankle.
- Take a deep breath and firmly inhale and raise your lower abdomen.
- When you release your breath, move your left foot in approximately a 45-degree angle and your right foot out till your toes are pointing toward the mat’s short border.
- You want both legs to provide stability.
- To release the breath, drop your right arm and expand your body over your right leg.
- Depending on how your body feels, you can do this by resting your elbow on your right thigh or by laying your hand on the floor inside or outside of your right foot.
- Your left arm should be raised above your head.
- With the left fingers, extend from the outside of the left heel and rotate the rib cage upward toward the ceiling.
- You can gaze up at the ceiling from behind the left armpit if your neck lets it.
- You can hold this stance for five to ten breaths.
- Exit this position by pressing firmly into your feet, then straighten up and take a deep breath while extending your left arm wildly.
- Change your feet to perform the same movement on the other side.
- Then return to your neutral position.
- Then relax.
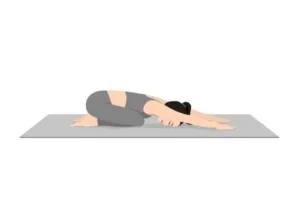
Balasana (Child Pose)
- To begin, lower yourself to your hands and knees with your big toes touching and your knees hip-width apart.
- Bring your hips back to your heels after reaching toward the top surface of the mat with your outstretched arms.
- Relax your shoulders and neck by resting your forehead on the mat.
- Take deep, continuous breaths while maintaining this position for as long as you would like.
- Then return to your neutral position.
- Then relax.
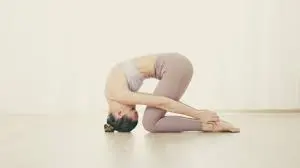
Shashankasana pose (Rabbit Pose)
- Sit on your butt and heels to begin.
- The knees, thighs, and ankles are all joined together.
- Gripping the heels with your palms outward, place your thumbs on the outside borders of your feet and your fingers on the inside arches.
- To start rounding the back, drop the head to the floor while elevating the forehead to the knees.
- It has the chin pulled in.
- Roll forward until your arms are straight, lifting your hips and butt off your heels.
- Pull on your heels while taking a breath as you go deeper into the position.
- Release the heels’ grip and return to your seated position.
- Then return to your neutral position.
- Then relax.
Virabhadrasana (warrior I pose)
- You should begin by standing on the floor.
- Put your left foot back a step with the toes pointed slightly out.
- Ensure that your feet are stable and firm by adjusting your position.
- To raise your hands to your hips and line them up with the front edge of the mat, slightly rotate your outer left hip forward and your outer right hip back.
- Make sure your shoulders are level and your upper body is facing the floor’s front edge.
- The right thigh and right knee should be bent parallel to the floor.
- Continue to bear your weight on the front of your heel and big toe.
- Raise the back foot from the inner arch and lower it.
- Keep your back leg engaged since it becomes your support.
- Relax the base of your neck, extend your spine, followed by slowly push your lower abdomen in.
- Raise your arms upwards and extend your chest.
- Expand the space between the shoulder blades, allowing the bases to rise forward and toward the spine.
- Contract your triceps muscles to straighten your arms.
- Hold this stance for 5 to 15 breaths while you relax your face and feel the strength from your base.
- Then return to your neutral position.
- Then relax.
- Repeat the exercise on the opposite side.

Which safety measures should be followed during exercise?
- When exercising, avoid making sudden or powerful movements.
- When working out, be concentrated and keep your eyes on yourself to avoid falling.
- Start cautiously and increase the number of sets and repetitions as your strength improves.
- When exercising, take deep, consistent breaths for a better experience.
- It’s a good idea to eat something light before working out. If you’re hungry, don’t eat just before or right after working out.
- Wear comfortable, loose-fitting clothing to improve the impact of your workout and to provide simple mobility. Stay away from clothing that is overly tight or trendy.
- Stay hydrated by drinking lots of water before, during, and after your session.
- If you get sudden, intense pain, stop right away.
- When exercising, take care to maintain good posture.
When do you quit working out?
- High fever
- You’re feeling sick.
- Exercise should be stopped if it starts to hurt.
- Headache
Summary:
Yoga is a weight loss method that requires dedication and practice. More physically demanding yoga burns the most calories and may help you avoid gaining weight. You will feel more responsive and flexible than you would alternatively, and yoga will soon become an essential part of your daily routine.
You must dedicate yourself to your practice and yourself if you wish to use yoga to lose weight. To improve your chances of staying to your goals, set small ones and make small, consistent changes. You might discover that you become attracted to nutritious foods and lifestyles as your practice and awareness grow.
If you are trying to lose weight, keep in mind that yoga is just one part of a larger picture. For immediate and desired effects, you must maintain a balanced diet and engage in some exercise. The perfect moment to do yoga is in the early hours of the morning. It will alleviate the tension and weight that multitasking and a fast-paced lifestyle may cause you to feel throughout the day.
FAQ:
Does yoga help you lose weight?
The main advantage of yoga is that it may be used as a form of stretching or strength training. Compared to vigorous aerobic exercise, stretching does not burn as many calories. Therefore, a regular yoga practice is unlikely to have a significant impact on weight loss, even though it might help someone burn a few extra calories.
Does doing yoga for 30 minutes a day help people lose weight?
Because moving their bodies requires more work, those who lift heavier weights are more likely to experience results more quickly. But everyone should be able to lose weight with frequent 30-minute sessions as long as they eat healthily.
Is yoga better than going to the gym?
Training at the gym is the best option if you want to lose weight and build muscle. However, yoga is a good choice if you want to achieve inner growth and mental and physical harmony. However, the benefits of yoga will take time to manifest. People who are employed can practice both to achieve the ideal balance.
Is yoga more effective in the morning than at night?
stating that there are benefits to both early morning and late evening yoga sessions. Practicing in the morning improves one’s performance in their line of work. It leaves one feeling refreshed and at ease in the evening after the strain of the day.
Can someone beginner to yoga do it every day?
Think about scheduling brief practice sessions of 15 or 20 minutes. Even if you practiced this every day or only took one or two days off every week, there would be minimal risk of improper use from postures. It’s also a fantastic method for newcomers to get begin.
How quickly can you lose weight with yoga?
Each person experiences weight loss from yoga at a different pace. However, you will begin to notice improvements if you practice yoga regularly for at least three to four months. Yoga poses that can help you reach your weight loss objectives are the Boat Pose, Plank Pose, and Warrior Pose.
In what ways does yoga aid in weight loss?
A few factors, such as energy expenditure during yoga sessions, promoting increased exercise by reducing joint and back pain, increasing mindfulness, elevating mood, lowering stress, and fostering a sense of community among yogis, are linked to weight loss and maintaining one’s weight.
References:
- Rakshak and colleagues. October 26, 2024. Weight Loss Yoga | Yoga poses can help you lose weight: The Art of Living. Creating a Festive Lifestyle: A Way of Living. Yoga-sequences-for/yoga-for-weight-loss https://www.artofliving.org/in-en/yoga.
- E. Cronkleton (2024, Sept. 18). Yoga for Losing Weight. Health Line. Yoga as a weight-loss method https://www.healthline.com/health/weight-loss
- October 30, 2023: Gupta, A. Exhausted from attempting weight loss tricks? If you want to lose weight more quickly, try these ten yoga poses. Health shots. The following 10 yoga poses are proven to be effective for weight loss: https://www.healthshots.com/fitness/weight-loss/yoga-for-weight-loss/
- P. C. Team (2024, May 3). 10 Weight Loss Yoga Asanas. Care Pristyn. Yoga poses for losing weight (pc0113) https://www.pristyncare.com/blog/
- July 15, 2022: Fargo, M. Does yoga help people lose weight? We asked the professionals how to do it correctly. health of women. https://www.womenshealthmag.com/uk/fitness/yoga/a703722/the-weight-loss-benefits-of-yoga
- Image 1, Namaskar Surya Mantra. September 23, 2018. Swayamsewak Sangh Mauritius is a Hindu group. Surya Namaskar Mantra: https://hssmru.org/mantra/
- Image 2, March 4, 2021: Ekhart Yoga. Yoga Bow Pose (Eckhart). Ekhart Yoga. Bow pose: https://www.ekhartyoga.com/resources/yoga-poses
- Image 3,S. Shah (n.d.). Follow the Sri Sri School of Yoga’s Easy Angle Pose or Konasana to strengthen your spine. The angle position can be performed as follows: https://srisrischoolofyoga.org/na/blog/
- Image 4, Yogateket (n.d.). Yogateket. https://www.yogateket.com/blog/salamba-sarvangasana-shoulderstand. YOGATEKET. Shady pose.
- Image 8, June 8, 2023: Yogasadhana. The Yogasadhana technique for Navasana (Boat Pose). Sadhana, or yoga. #navasana-boat-pose on YogaSadhanaguru.com
- Image 10, Oct. 16, 2023, Jannyca. With these four easy steps, you can perfect the alignment of your chair pose. Adjust your chair pose with these four simple steps from YogaUOnline. https://yogauonline.com/position-library/
- Image 12, Gaia (n.d.) | Expanded Side Angle posture: Utthita Parsvakonasana. Gaia’s The article “Extended Side Angle Pose: Utthita Parsvakonasana” can be found at https://www.gaia.com.
- Image 13, A. Time (n.d.). 8,400+ iStock offers royalty-free vector graphics and clip art of yoga poses. Yoga Balasana Illustrations: https://www.istockphoto.com/illustrations
- Image 14, S. Bhattacharya. 2024a, Feb. 7. Rabbit Pose: How to Perform Shashankasana and Its Five Benefits. Shashankasana advantages or rabbit pose: Healthshots. https://www.healthshots.com/fitness/staying-fit/


3 Comments