List of 100 Best Exercises To Do At Home
Here is a list of the 100 Best Exercises to Do at Home with a brief description for each. These exercises can help target different muscle groups and improve your strength, flexibility, and overall fitness.
List Of Exercises To Do At Home
- Push-ups
- Squats
- Plank
- Lunges
- Mountain Climbers
- Jumping Jacks
- Burpees
- Sit-ups
- High Knees
- Tricep Dips (using a chair)
- Side Plank
- Bicycle Crunches
- Wall Sit
- Glute Bridges
- Step-ups (using stairs or a sturdy surface)
- Arm Circles
- Calf Raises
- Side Lunges
- Leg Raises
- Donkey Kicks
- Russian Twists
- Superman Exercise
- Flutter Kicks
- Reverse Crunches
- Hip Thrusts
- Skater Hops
- Standing Toe Touches
- Chair Pose (Yoga)
- Dead Bug Exercise
- Shoulder Taps
- Pike Push-ups
- Side Leg Raises
- Bear Crawls
- Crab Walk
- Kickbacks
- Star Jumps
- Spiderman Push-ups
- Crossbody Mountain Climbers
- Bridge March
- Side Shuffles
- V-Ups
- Plank to Push-Up
- Inch Worms
- Wall Push-Ups
- Standing Side Crunches
- Cossack Squats
- Single-Leg Deadlifts
- Hollow Body Hold
- Reverse Lunges
- Pistol Squats
- Jump Squats
- Heel Touches
- Side Plank Hip Dips
- Lying Leg Circles
- Broad Jumps
- Clamshells
- Standing Calf Stretch
- Tuck Jumps
- Quadruped Shoulder Taps
- Arm and Leg Raises (on all fours)
- Sumo Squats
- Diamond Push-ups
- Windshield Wipers (lying on back)
- Archer Push-ups
- Reverse Plank
- Lateral Band Walks (if resistance bands are available)
- Wall Angels
- Shoulder Bridge
- High Plank to Low Plank
- Toe Taps (lying on back)
- Bird Dog
- Seated Leg Tucks
- Side Step Squats
- Prone Cobra
- Lying Hip Abduction
- Arm Pulses
- Half Burpees
- Standing Kickbacks
- Superman Hold with Arm Pullback
- Side Plank with Leg Lift
- Single-Leg Glute Bridge
- Forward-Backward Hops
- Scissor Kicks
- Crab Toe Touches
- Lunge Jumps
- Plank Jacks
- Shoulder Squeeze
- Knee Drives
- Side Lunges with Reach
- Standing Oblique Crunch
- Donkey Kick Pulses
- Standing Hip Circles
- Box Jumps (using a sturdy surface)
- Side-to-Side Hops
- Wrist Circles
- Ankle Hops
- Standing Forward Fold (stretch)
- Hip Flexor Stretch
- Reverse Tabletop Hold
- Bridge
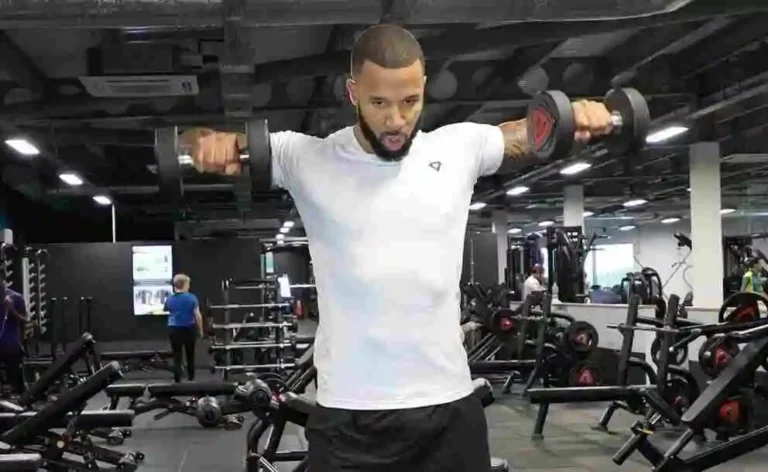
Push-ups
Instructions:
- Spreading your fingers will help you stay balanced.
- Stand with your feet together or slightly apart and your toes planted firmly on the ground for support.
- As you straighten your arms, push yourself back up.
Squat
Instructions:
- Toes should be pointed slightly outward and feet should be shoulder-width apart.
- Like you’re seated on a chair, push your hips back.
- On a mat or the floor, lay face down.
Plank
Instructions:
- Keep your forearms flat on the floor and place your elbows just below your shoulders.
- You should align your entire body from head to heels.
- Your body should be gently lowered back to the floor after lowering your knees to the ground to exit the plank.
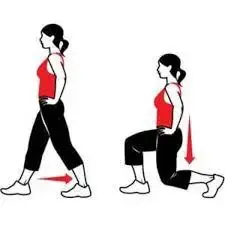
Lunges
Instructions:
- Put your feet hip-width apart and stand erect.
- You can hang your hands by your sides or place them on your hips.
- Bend both knees to lower yourself until your front thigh is parallel to the floor and your back knee is just above the floor.
Mountain Climbers
Instructions:
- In order to maintain a fast pace for a cardio challenge, keep your core active to prevent your hips from dropping while you alternate legs as rapidly as you can.
- Continue until you reach the specified time, like 30 to 1 minute, or reach a certain amount of repetitions, like 20 on each leg.
- Switch legs quickly by stretching your right leg back and raising your left knee to your chest.
Jumping jacks
Instructions:
- Reassemble your legs and leap again, keeping your arms by your sides.
- Your hands might be flat or clasped together.
- Maintain a fluid, rhythmic action as you leap and switch between these positions.
- Natural breathing occurs while you leap and move your arms. Perform for 30 to 60 seconds at first, or finish 15 to 20 repeats.
Burpee
Instructions:
- With your arms by your sides and your feet shoulder-width apart, take an erect stance.
- Put your hands down. Put your hands on the floor in front of you, right inside your feet. Return to a plank posture by jumping your feet.
- Return your feet to your hands to return to the squat position.
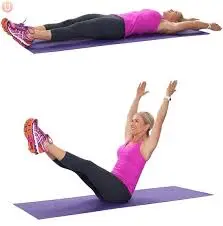
Sit-Ups
Instructions:
- Stretch your feet hip-width apart.
- Inexperienced: Over your chest, fold your arms.
- With the help of your core muscles, steadily raise your upper body off the floor. Make sure your feet are hip-width apart.
High Knees
Instructions:
- Standing tall, keep your feet hip-width apart.
- Get your core active: To increase stability, tighten your abdominal muscles.
- Switch quickly so that your right foot returns to the floor and your left knee is up. Execute the action rapidly, switching your knees in a jogging pattern.
Tricep Dips (using a chair)
Instructions:
- Verify that it is stable enough to hold your weight and won’t slip or topple over while you’re exercising.
- Taking a seat on the edge of the chair, grasp it with your hands and point your fingers forward.
- As you lower yourself toward the floor, softly bend your elbows. Keep your elbows pointed directly behind you and refrain from flaring out to the sides.
Side Plank
Instructions:
- Place your feet straight and in alignment as you stack your legs on top of one another.
- Immediately place your bottom elbow beneath your shoulder. Your forearm should form a stable base by resting perpendicular to your body.
- Your body shouldn’t twist; it should remain in a straight line.
Bicycle Crunches
Instructions:
- Your elbows should remain open as you place your hands loosely behind your head.
- Take your legs off the ground and bend your knees to a 90-degree angle. Move your belly button closer to your spine to build stronger abdominal muscles.
- Lift your shoulder blades slightly.
Wall Sit
Instructions:
- Approximately two feet (60 cm) from a wall, place your back against it. Be careful to place your feet hip-width apart.
- Make an effort to keep your shoulders relaxed and your back straight.
- Do not extend your knees past your toes; instead, keep them just above your ankles. To keep your body stable, tense your abdominal muscles.
Glute Bridges
Instructions:
- Your hands should rest on your arms, which should be by your sides. Put your hands on your arms at your sides. Maintain a slight pressure on the floor with your lower back by contracting your abdominal muscles.
- Don’t arch your lower back too much. Raise yourself toward the ceiling by using your heels.
- During the peak of the exercise, tighten your glutes.
- As your level of fitness permits, do two to three sets of 10 to 15 repetitions each.
Step-Ups (using stairs or a sturdy surface)
Instructions:
- Choose a stable surface that is knee-height, like a step, bench, or box.
- Make sure the platform is steady and won’t sway while you’re exercising. Your feet should be hip-width apart as you face the platform.
- Place your arms on your hips for balance, or keep them at your sides for relaxation. Stand solidly on the platform with your right foot.
- Elevate your body onto the platform by applying pressure via your right heel.
Arm Circles
Instructions:
- Form a “T” with your arms extended out to the sides at shoulder height and parallel to the floor.
- Do 10–15 repetitions or 15–30 seconds. Turn around and go backward in circular motions. As you go, start small and enlarge the circles.
- Continue to do for the same amount of time or number of repetitions.
Calf Raises
Instructions:
- Position yourself so that your feet are hip-width apart and your arms are at your sides.
- Make use of your core for support and keep your toes and heels equally weighted. Gently lift your heels off the ground by applying pressure via the balls of your feet.
- Control the fall so that your heels don’t drop too soon. Do a set of 12–15 repetitions. You may raise the amount of sets from two to three, according on how fit you are.
Side Lunges
Instructions:
- Maintain a neutral spine throughout the workout by using your core. While maintaining a forward-pointing toe, take a large stride out to the right with your right foot.
- When you walk outdoors, bend your right knee and push your hips back while keeping your left leg straight.
- For as many repetitions as you like, keep doing side lunges alternately.
Leg Raises
Instructions:
- Maintain a straight and united stance while supporting yourself with your arms at your sides, palms down.
- Raise your legs as high as you can without straining them, or until they angle around 90 degrees with your body.
- For each set, do 10–15 repetitions. The number of sets can be changed from two to three based on your level of fitness.
Donkey Kicks
Instructions:
- Known as the “tabletop” posture, start by getting down on your hands and knees on an exercise mat.
- Keeping your knee at a 90-degree bend, steadily kick your right leg upward toward the sky.
- Without arching your back or changing your weight, try to elevate your leg as high as you can by pushing through your heel.
- Keep your hips square to the floor and your torso steady throughout the exercise.
Russian Twists
Instructions:
- Sit down with your feet level on the floor and your knees bent.
- Keep your chest wide and your back straight as you sag a little. You should have your core engaged and in a V-sit position.
- Repeat the side-to-side twists until you reach the required number of repetitions, which is typically 15-20 on each side for beginners or more for a more difficult variation.
- Do two to three sets, according to your level of fitness.
Superman Exercise
Instructions:
- Maintain a straight-back posture with your toes pointed downward.
- Your body and thighs should be raised off the ground, and your arms and legs should be straight. Return to the earth slowly while keeping your arms, chest, and legs under control.
- Take a little break and then perform the action again. For two to three sets, depending on your level of fitness, perform 10 to 15 reps every set.
Flutter Kicks
Instructions:
- You may support yourself by placing your hands behind your glutes, or you can keep them by your sides or stretch them above your head for a more difficult position.
- Your feet should be contracted (toes pointing away from your torso), and your legs should be straight and close together.
- Try to complete three sets with brief rest intervals in between.
Reverse Crunches
Instructions:
- Your legs should be raised off the ground while you maintain your feet together and bend your knees to a 90-degree angle.
- To avoid stress, maintain a neutral neck position and a relaxed upper body. With your hips curled upward, bring your knees closer to your chest.
- When lifting, control the action rather than utilizing momentum or swinging your legs.
- Maximize abdominal engagement by focusing on controlled motions and taking a short break in between sets.
Hip Thrusts
Instructions:
- If you want to increase resistance, you can roll a barbell or lay a weight plate over your hips (optional for beginners).
- Maintain a neutral head and neck posture while gazing directly ahead or slightly upward.
- In order to produce a straight line from your knees to your shoulders, your hips should rise until your thighs are either parallel to the ground or slightly higher.
- Aim for three to four sets, with ten to fifteen repetitions per set.
Skater Hops
Instructions:
- Maintain an engaged core and a small bend in your knees.
- For balance, stretch your arms out in front of you or rest them on your hips. Using your arms to assist push yourself keep your balance, and bring your right leg behind your body (as if crossing it over).
- Continue in a smooth, hopping motion, switching sides.
- Exercise for a predetermined amount of time (e.g., 30 seconds)
Standing Toe Touches
Instructions:
- Make sure your arms are at your sides and straight.
- Keep your shoulders loose and your core strong as you stand erect. As your torso descends, extend your arms toward your toes.
- With an emphasis on controlled movement and proper technique, complete 10–15 repetitions.
- You should not experience discomfort, just a slight strain.
Chair Pose (Yoga)
Instructions:
- While keeping your legs properly aligned, lower your hips as much as you can. Ideally, the thighs should be as near to the floor as feasible.
- Reach your arms upward as you lower yourself into the position, maintaining them parallel to one another or with your palms facing inward toward the ceiling.
- Maintain your deep breathing while paying attention to your legs and core’s strength and stability.
Dead Bug Exercise
Instructions:
- The floor should be level with your feet.
- Raise your arms straight over your shoulders and toward the ceiling.
- To engage your core, flatten your lower back into the floor and slowly draw your belly button in the direction of your spine.
- As instructed in your regimen, repeat the action ten to fifteen times on each side.
Shoulder Taps
Instructions:
- To provide a solid foundation, place your hands exactly behind your shoulders and spread your fingers widely.
- Your feet should be hip-width apart, your core should be active, and Your feet should be hip-width apart, your core should be active.
- Tape for a certain number of repetitions (10–20 on each side, for example) or for a predetermined amount of time (30–60 seconds).
Pike Push-ups
Instructions:
- To make your body create an inverted “V” shape, similar to a pike posture, raise your hips toward the sky.
- Make sure your heels are pointed toward the floor and your legs are straight. Exercise intensity increases with the distance between your feet and your hands.
- Keep your form and avoid hitting the ground as you lower your head as far as you can. Keep your body straight and your core active as you return to the initial pike posture.
- Do the push-ups as many times as you like, paying close attention to your slow, deliberate motions.
Side Leg Raises
Instructions:
- Stack your legs on top of one another and keep them straight. You have the option to prop your head up with your hand or rest it on your lower arm.
- For support, lay your upper hand on your hip or place it on the floor in front of you.
- Aim to lift your leg to a 45-degree angle keeping the leg straight by pointing your toes forward or slightly downward.
- Maintaining control over your movement, carefully return your leg to the starting position. Don’t allow your leg to drop rapidly or with force.
Bear Crawls
Instructions:
- You should place your hands shoulder-width apart and your feet hip-width apart.
- In order to maintain a posture akin to a tabletop, keep your knees slightly above the floor and your elbows slightly bent.
- Don’t wobble or shift your hips too much; instead, keep your chest close to the floor and your core steady.
- Maintain a constant tempo while emphasizing controlled motions over quickness. The objective is to move with quality since this will enhance muscular activation.
- When you’ve taken as many steps or as far as you want, stop and start over.
Crab Walk
Instructions:
- Lift your hips off the floor by pressing through your hands and feet, making sure your body is in a secure “tabletop” position.
- Moving in a crab-like pattern, switching between your hands and feet while maintaining a steady torso and raised hips, is the aim.
- For the duration or distance you have specified, keep moving ahead. your position before carrying out the crab walk once more.
Kickbacks
Instructions:
- After completing as many repetitions as you like, swap legs. After a brief moment of holding the posture, go back to the beginning position.
- Switch legs once you’ve performed the necessary number of repetitions. Maintain a smooth motion and concentrate on the glute contraction at the apex of the kick.
- Breathe in as you return your leg to the beginning position and exhale as you raise it.
Star Jumps
Instructions:
- As you stand, put your feet together and your arms by your sides.
- As you jump, spread your arms wide above and extend your legs outward, making sure that your hands and feet move together.
- Make sure your body makes an “X” or star shape at the top of your jump. Make sure you land with control to prevent damage and lessen joint stress.
- Leap with explosive energy and simultaneously stretch your arms and legs out to the sides to form a star shape with your body.
Spiderman Push-ups
Instructions:
- Keep your body in a straight line from your head to your heels by engaging your core to maintain a plank position.
- Get your right knee up to your right elbow to put your body back in the beginning position. Pull the knee up while rotating the hip and using your core.
- Be careful when moving your knee; it should approach your elbow but not contact it.
- Lower yourself into the next push-up by driving your left knee to your left elbow.
Crossbody Mountain Climbers
Instructions:
- Keeping your body in a straight line from your head to your heels means using your core. The distance between your hands and feet should be shoulder-width and hip-width, respectively.
- Keep your core active and maintain a plank posture as you drive your right leg toward your left elbow.
- Continue alternating your legs in a crossbody motion as fast as you can while keeping your form under control.
Bridge March
Instructions:
- Prepare to raise your hips by contracting your core and pushing through your heels.
- Keep your back neutral and not overly arched, and make sure your knees and hips are exactly in line.
- On the left side, repeat the motion, keeping your hips up and raising your left leg toward your chest.
Side Shuffles
Instructions:
- To keep your stance squat-like, keep your hips low and your knees supple.
- Once a given distance has been covered, halt and shuffle back in the other direction (to the left).
- For whatever long you want or how many repetitions you want, keep shuffling back and forth at a constant speed.
V-Ups
Instructions:
- In an attempt to make a “V” with your body, bring your hands to your feet.
- Maintaining core engagement and control of the action, slowly drop your legs and torso back down to the beginning position.
- Repeat for the required number of times while maintaining control and paying attention to the correct form.
Plank to Push-Up
Instructions:
- You can prevent your hips from sagging by keeping your feet together and using your core.
- Instead of resting them on your elbows, place your hands flat on the floor or in a fist.
- Start with your right hand pushing up from the forearm plank, then switch to your left hand to complete the push-up posture, which involves placing both hands flat on the floor.
- Continue doing push-ups and forearm planks alternately until you reach the target number of reps.
Inch Worms
Instructions:
- With your arms relaxed at your sides and your feet hip-width apart, take a proud stance. Keep your legs as straight as you can while bending forward at the hips (a small bend in the knees is OK if necessary).
- To keep your hips from sagging, maintain a firm core. Once your feet are near your hands, raise your body and straighten your legs to stand again.
- Focus on making fluid, controlled motions as you repeat the exercise as many times as you like.
Wall Push-Ups
Instructions:
- Position yourself facing a wall and, depending on how comfortable you are, place your feet two to three feet from the wall.
- Lay your hands flat on the wall at chest height and shoulder (or somewhat broader) distance.
- Do not allow your hips to rise or fall during the exercise; instead, maintain a straight body.
- The movement should be performed for the appropriate amount of repetitions, usually 10 to 15 for each set.
Standing Side Crunches
Instructions:
- Keep your shoulders loose, your core active, and your back straight.
- As you execute the crunch, feel the side of your abdomen contract, activating your obliques.
- Keep switching between the two sides. Do as many repetitions of the workout as you like.
Cossack Squats
Instructions:
- Throughout the exercise, keep your shoulders back, your chest up, and your core active.
- Your hips should drop toward the floor when you bend the knee of the leg you’re squatting on.
- Per leg, perform 8–12 repetitions to get the appropriate number of sets, usually 2-3.
Single-Leg Deadlifts
Instructions:
- To increase resistance, you can hold a dumbbell, kettlebell, or barbell in one hand. If you’re just starting out, you can also do the exercise without any weights. Start by moving your weight to one leg while slightly raising the other leg off the ground.
- With the weight floating in front of your shin, lower your arms toward the floor.
- Change to the second leg when you’ve finished the required amount of repetitions on one leg, which is usually 8–12 reps.
Hollow Body Hold
Instructions:
- Make sure there is no space between your lower back and the mat by pressing your lower back against the floor.
- Your core is activated when you pull your belly button toward your spine.
- Hold for the appropriate amount of time, then carefully return your arms and legs to the beginning position and take a quick break.
Reverse Lunges
Instructions:
- With your arms at your sides and your feet hip-width apart, take a proud stance.
- To keep proper posture, keep your core strong and your chest up.
- If you’re using weights, like dumbbells, place them on your shoulders or at your sides in each hand.
- Once more, stand tall with your feet hip-width apart, bringing your right foot back to meet your left. Make sure that your rear knee is firmly bent but not touching the floor when you repeat the same motion with this leg.
- Continue switching legs for two to three sets, doing 10 to 12 repetitions for each leg.
Pistol Squats
Instructions:
- Maintain a straight leg extension in front of you. To help with balance, you can, if necessary, keep your toes on the ground.
- Maintain a strong core as you rise, and concentrate on pushing through your standing leg’s quadriceps and glutes.
- Once you’ve finished the set on one leg, move on to the other and do it again.
Jump Squats
Instructions:
- Maintain a shoulder-width distance between your feet.
- position with your arms at your sides, back straight, and chest high.
- Land lightly on the balls of your feet, then quickly return to the squat position to absorb the stress.
- Complete the required number of repetitions while keeping proper form.
Heel Touches
Instructions:
- Maintain an extended arm position with the palms pointing down at your sides.
- Extend your left hand to your left heel.
- Switch sides in a smooth, controlled manner.
Side Plank Hip Dips
Instructions:
- Keep your elbow right under your shoulder and keep your lower forearm on the floor.
- Your head and feet should line up when you lift your hips off the ground.
- To maintain balance, place your upper hand on your hip or keep it out toward the ceiling. Your hips should not contact the floor as you slowly descend them toward it.
- For added difficulty, place a weight plate on your hip or stretch your upper leg.
Lying Leg Circles
Instructions:
- Stretch your legs straight out in front of you while keeping your arms at your sides, palms down, for support.
- Pulling your belly button toward your spine will activate your core. While maintaining the opposite leg extended and motionless on the ground, raise your right leg 6 to 12 inches off the ground (or more if you’re a beginner).
- Draw circles counterclockwise when you’ve completed the required amount of circles in one direction.
- Lower your right leg gently to the floor, then repeat the movement with your left leg.
Broad Jumps
Instructions:
- Maintain a shoulder-width distance between your feet.
- Maintain a small bend in your knees and keep your arms at your sides.
- Hold your posture straight and use your core.
- You may gain velocity by swinging your arms backward.
- Before the following jump, completely stand up. Complete the required number of repetitions, making sure that every leap is forceful and controlled.
Clamshells
Instructions:
- You can balance by resting your head on your lower arm and placing your upper hand on your hip.
- Resuming the beginning posture, slowly drop your upper knee while maintaining control.
- Repeat as many times as you like, then go on to the opposite side.
Standing Calf Stretch
Instructions:
- With your back to a wall or a sturdy surface, such as a table or chair, you can stand for support.
- Verify that both feet’s toes are facing directly ahead. Keep your rear leg straight and your heel firmly planted.
- The back leg’s calf should feel stretched.
- Stretch the opposite leg again. Maintain this posture for 20–30 seconds.
Tuck Jumps
Instructions:
- Your arms should remain at your sides and your knees slightly bent.
- Allow your knees to flex to absorb the shock as you gently land on the balls of your feet.
- Take a quick break and be ready for the next jump. Execute the subsequent leap right away, striving for precise and forceful motions.
- Perform 10–12 repetitions, or as many as your level of fitness permits.
Quadruped Shoulder Taps
Instructions:
- Start in a quadrupedal stance on all fours, placing your knees behind your hips and your hands precisely beneath your shoulders.
- Maintain a neutral neck posture and a flat back.
- Return your right hand to the floor. For the required number of repetitions or times, do the action slowly and deliberately, switching sides.
Arm and Leg Raises (on all fours)
Instructions:
- Put your hands squarely behind your shoulders and place your knees beneath your hips to start in a quadrupedal (all-fours) stance.
- Keep your back flat, your neck neutral, and your core engaged.
- While keeping your balance and stability, pause for two to three seconds at the apex of the action.
Sumo Squats
Instructions:
- Place your feet wider than shoulder-width apart and point your toes outward at a 45-degree angle.
- Keep your shoulders back and your chest straight. To keep your back supported during the exercise, tighten your core muscles.
- Do as many repetitions as you like (10–15 reps each set, for example).
Diamond Push-ups
Instructions:
- Start in the high plank position with your body in a straight line from your head to your heels.
- Do not lock your elbows at the top; instead, completely extend your arms.
- Do as many repetitions as you like (e.g., 8–12 reps each set).
Windshield Wipers (lying on back)
Instructions:
- Your torso should be at a 90-degree angle with your legs.
- Avoid letting your legs or back arch contact the floor and maintain an engaged core. Return your legs to their initial position while controlling the movement with your core.
- Complete the exercises for the specified amount of time (e.g., 30 seconds per side) or repetitions (10–12 reps per side).
Archer Push-ups
Instructions:
- For stability, use your glutes and core.
- Make sure your wrists and shoulders are in line as you spread your hands widely apart
- Try to bring your chest as near to the working hand as you can while keeping it low. For the number of repetitions you want, keep switching sides.
Reverse Plank
Instructions:
- Take a seat on the floor with your feet together.
- Keep your legs straight out in front of you.
- With your fingers pointed either toward your feet or slightly out to the sides, place your hands on the floor behind you.
- If desired, repeat the action after returning to the sitting posture and taking a short break.
Lateral Band Walks (if resistance bands are available)
Instructions:
- Put the resistance band around your ankles (for a more difficult variation), slightly above your knees, or around your legs.
- When your legs are naturally in a standing posture, there should be some strain in the band.
- For as many repetitions as you like, keep switching between the sides.
Wall Angels
Instructions:
- As you stand with your back to a wall, make sure your head, shoulders, buttocks, and heels all touch the wall. To do this, you might need to slightly change how far away you are from the wall.
- To keep your posture and stability during the exercise, keep your core active.
- To use the muscles in your upper back, pull your shoulder blades down and together. For a single set, do 10–15 repetitions. Two to three sets are possible, depending on your skill level.
Shoulder Bridge
Instructions:
- Keep your arms at your sides and point your palms toward the floor.
- You should have a neutral spine and a relaxed head, neck, and shoulders.
- Take a little break and get ready for the subsequent repetition.
High Plank to Low Plank
Instructions:
- Start by assuming the high plank posture, which is sometimes referred to as the push-up position.
- For stability, place your hands exactly behind your shoulders, fingers wide apart.
- To get both elbows exactly beneath your shoulders, carefully drop your right forearm and then your left forearm to the floor from the high plank position.
- Your head should be in a direct line with your heels as you return to the high plank posture.
- Make a calm, fluid transition from high plank to low plank and back to high plank.
- Perform 2–3 sets of 10–15 repetitions, or as many as you can manage while maintaining good form.
Toe Taps
Instructions:
- Raise your legs until they are parallel to the floor and your knees are bent at a 90-degree angle, creating a tabletop position.
- To prevent straining your lower back, avoid arching your back. Return to the tabletop posture with your right foot.
- Tap your toes softly on the floor while you continue to switch between your right and left legs.
- For two to three sets, do 10 to 15 repetitions per leg.
Bird Dog
Instructions:
- Maintain a neutral neck posture and a flat back while gazing directly down at the mat.
- Don’t sink your lower back or rotate your body; instead, keep your hips straight to the floor.
- When you stretch your limbs, keep your position steady and under control. Continue switching between sides for two to three sets of ten to fifteen repetitions each.
Seated Leg Tucks
Instructions:
- Place your feet flat on the floor and sit on the edge of a strong chair or bench.
- For support, keep your hands at your sides and rest them on the chair’s edge or grab the seat.
- Throughout the exercise, maintain a bent knee position and an active core. After a brief pause in which your legs are stretched, slowly pull your knees back toward your chest, using your hip flexors and core to do so.
- Depending on your level of fitness, do two to three sets.
Side Step Squats
Instructions:
- Maintain a straight back, relaxed shoulders, and a raised chest. Make sure your knees do not extend past your toes but rather track over them.
- For ten to fifteen repetitions on each side, keep switching between side steps and squats.
- Depending on how fit you are, do two to three sets.
Prone Cobra
Instructions:
- Maintain a straight body alignment and active muscles for 20 to 30 seconds while holding the Prone Cobra posture.
- Throughout the hold, take steady, deep breaths. Return to the beginning posture by slowly lowering your arms, legs, and chest.
- After a quick rest, continue for two to three sets, progressively lengthening the hold period as your strength increases.
Lying Hip Abduction
Instructions:
- Place your legs on top of one another while maintaining a straight body alignment from head to toe.
- If you need support, lay a cushion below your lower arm or rest your head on it.
- Lift the leg as far as it will go without causing strain, which should be between 45 and 60 degrees.
- Keep the leg from dropping too rapidly; regulate the motion to activate all of the muscles. Completing two to three sets on each side will depend on your degree of fitness.
Arm Pulses
Instructions:
- Extend your arms in front of you parallel to the floor.
- While the palms face down
- Small, targeted pulses that are usually only a few inches up and down are ideal. In order to assist in stabilizing your body and prevent needless torso movement, keep your core active.
- Keep your pace constant and concentrate on contracting your shoulder muscles with every pulse. Do the pulses for 20 to 30 seconds, or until your arms and shoulders begin to feel tired.
- Take a 15–30 second pause.
Half Burpees
Instructions:
- Place your feet shoulder-width apart and keep your arms at your sides as you stand.
- Keep your back straight and your core active. To prepare for a push-up, place your hands on the floor precisely behind your shoulders in front of you.
- Assume a straight posture from head to heels, placing your hands exactly behind your shoulders.
- You might choose to complete the exercise with a clap of your hands aloft or a little hop at the top for extra intensity. Finish sets two and three, taking brief pauses in between.
- Rise tall and firmly stretch your hips from the squat position.
Standing Kickbacks
Instructions:
- Keep your posture straight and prevent arching your lower back by using your core.
- For the glutes to contract as much as possible, hold the position for a short moment.
- Return to the starting position by lowering your leg slowly and deliberately.
- On one leg, repeat for the appropriate number of repetitions.
- Do 12–15 repetitions on each leg in 2–3 sets.
Superman Hold with Arm Pullback
Instructions:
- Start by laying face down on the floor with your arms out in front of you, palms down, and your legs straight behind you.
- From your head to your toes, maintain a straight bodily alignment. Squeeze your glutes and lower back muscles to slowly raise your legs and torso off the ground at the same time.
- Maintain a small bend in your elbows and concentrate on using your upper back muscles, including the rhomboids and lattice muscles. Finish two or three sets, taking brief breaks in between.
Side Plank with Leg Lift
Instructions:
- Start by extending your legs straight out and stacking them on top of one another while you are on your side.
- For stability, place your elbow just behind your shoulder while maintaining a 90-degree bend in your forearm.
- By utilizing your core and lifting your hips off the floor, you can ensure that your body is in a straight line from head to heels.
- To avoid any swinging or momentum, keep your movement under control and contract your core.
Single-Leg Glute Bridge
Instructions:
- Hold your arms flat at your sides, palms down, for stability.
- To avoid your lower back arching too much, make sure your core is working.
- Squeeze your glutes firmly and hold this position at the peak for a second. Keeping your leg extended in the air and preventing any drooping in the lower back, carefully drop your hips back to the ground.
Forward-Backward Hops
Instructions:
- As you stand, keep your feet hip-width apart and gently bend your knees.
- Keep your chest up, your arms by your sides, and your core engaged.
- To go forward, push off with the balls of your feet and use your hips and legs.
- Always aim for a gentle landing that causes as little strain as possible on your knees and joints. Do two to three sets of 10 to 20 hops in both forward and backward directions.
Scissor Kicks
Instructions:
- Your arms should be at your sides, palms down, while you rest flat on your back for support.
- Make sure your spine, neck, and head are all in line with the floor. Keep both legs straight and at a little angle as you raise them 6 to 8 inches off the ground.
- Avoid hurrying. Do scissor kicks for 15–30 seconds, then take a 30- to 1-minute break.
- Repeat for three sets, or modify according to your level of fitness.
Crab Toe Touches
Instructions:
- You should sit on the floor with your feet level on the floor, hip-width apart, and your knees bent.
- Place your hands on the floor behind you, fingers pointing toward your feet, and straighten your arms.
- Look directly ahead and maintain your head in line with your spine. Lift your hips and use your arms to support yourself as you slowly return to the initial crab posture.
- Continue completing 10 to 15 repetitions on each side for 30 to 60 seconds.
- For two to three sets, repeat after a 30- to 60-second break.
Plank Jacks
Instructions:
- Right beneath your shoulders
- Feet a little broader than shoulder-width apart
- Maintain a straight back by using your core.
Shoulder Squeeze
Instructions:
- Place your feet flat on the ground and sit upright on a chair.
- Maintain a straight back and relaxed shoulders. As though you were attempting to squeeze a pencil between your shoulder blades, slowly bring them together.
- Hold this posture for five to ten seconds. Return your shoulder blades to their initial position gradually. Throughout the workout, breathe normally rather than holding your breath.
- Do ten to fifteen repetitions two to three times a day.
Knee Drives
Instructions:
- Step forward into a lunge with one foot while keeping your feet shoulder-width apart. Maintain an active core and a straight back.
- Lower your arms to make touch with your back knee as you swiftly raise it toward your chest. Return to a lunge stance with your rear leg down.
- Repeat on the other leg after finishing a set of reps on the first leg.
- Balancing on one leg while performing the exercise can help improve your balance.
Side Lunges with Reach
Instructions:
- Drop your body into a lunge by stepping out to the side with your right leg, bending your knee.
- Your back should remain straight, as should your left leg. While doing a lunge, raise your arms above your head and stretch them toward the ceiling.
- Repeat on the left side. Keep your posture straight and your back straight.
- If you find the full range of motion challenging, you can reduce the depth of your lunge or skip the overhead reach.
Standing Oblique Crunch
Instructions:
- Be sure to stand tall and keep your feet hip-width apart.
- Put your hands behind your head.
- After a little period of holding this stance, go back to the beginning.
- Bring your left elbow up to your right knee and repeat on the left side. To get the most out of your muscles, do the exercise slowly and carefully.
- As you twist, release your breath, and then take another breath to go back to the beginning posture.
Donkey Kick Pulses
Instructions:
- Drop your hands slightly below your shoulders and knees under your hips.
- Ensure your back is straight and your neck is in a neutral posture.
- You should bend your foot so that the bottom of it faces the ceiling.
- Once you’ve performed the necessary number of repetitions on the first leg, repeat on the other leg.
Standing Hip Circles
Instruction:
- Keep your feet hip-width apart and stand tall. Maintain a calm and downward posture while using your core. Your left leg should bear greater weight.
- If you require balance, you can cling to a wall or other solid object.
- Avoid causing too much movement in your torso and concentrate on maintaining stability in your upper body.
- Make 8–10 circles in a single direction, such as clockwise.
- Do 8–10 circles in the opposite direction (e.g., counterclockwise) after finishing the circles in the first direction.
Box Jumps (using a sturdy surface)
Instruction:
- Once you land, bend your knees slightly to absorb the stress and maintain your balance. Choose a platform or strong box that is suitable for your level of fitness.
- Higher boxes (24–36 inches) are suitable for more experienced users, while beginners may begin with a smaller box (12–18 inches).
- Depending on your jump height and comfort level, place yourself one to two feet away from the box.
Side-to-Side Hops
Instruction:
- Maintain a hip-width distance between your feet.
- Maintain a modest bend in your knees and an engaged core.
- You can balance by placing your hands in front of you or on your hips.
- With your left foot, push off straight away, then jump back to your right, landing gently on your right foot.
- For as many repetitions or as long as you choose (for example, 30 seconds to 1 minute), repeat the side-to-side hops.
Wrist Circles
Instruction:
- If you decide to keep your arms out in front of you, hold them shoulder-high with your palms down. You can also hold your arms by your sides.
- Comfortably stand or sit with your arms out in front of you or at your sides.
- It is crucial to maintain a comfortable posture and a straight back.
- One hand should be made into a fist, but if you’d rather, you may keep your fingers out.
- Strive for a controlled and fluid motion.
Ankle Hops
Instructions:
- Place your feet approximately hip-width apart and stand tall.
- Avoid squatting; instead, keep your knees slightly bent.
- Look straight ahead, maintain an erect posture, and contract your core. Try to remain on the balls of your feet and keep your feet together.
- Take a rhythmic breath as you land and release it as you bounce up.
- Depending on your level of fitness, take a few sets of rest and repeat.
Standing Forward Fold (stretch)
Instructions:
- Maintain a lofty stance and place your feet hip-width apart, or a little wider if you want.
- Stand upright with your arms at your sides, flex your shoulders, and engage your core.
- When bending forward, start with your knees soft (slightly bent), not locked. As you release the breath, begin to bend at the hips instead of the waist and fold forward toward your legs.
- Hold for 15 to 30 seconds, or longer if you’re comfortable doing so.
- If necessary, support yourself with your hands on your thighs or legs, then rise steadily.
Hip Flexor Stretch
Instructions:
- Assume a starting position where your right knee is at a 90-degree angle and your left foot is in front of you. Position your feet flat on the floor, hip-width apart, and bend your legs while sitting on the floor.
- Exactly position your right knee beneath your right hip on the floor.
- The front part of your right hip, which houses your hip flexors, should feel stretched when you push your hips forward.
- Avoid allowing the left knee to splay out to the side and maintain your hips straight to the front.
Reverse Tabletop Hold
Instructions:
- With your feet flat and hip-width apart, sit on the floor and bend your legs.
- Hold your hands behind you on the floor with your fingers pointed toward your feet and your palms flat on the floor.
- Your elbows should point back, and your arms should be straight. Tighten your glutes and utilize your core to help stabilize your body.
- Lower your hips carefully back to the floor to exit the pose, managing the drop with your core.
Bridge
Instructions:
- On a mat or other soft surface, lie flat on your back.
- Place your feet level on the floor, hip-width apart, and bend your knees. When your arms are at your sides, your feet should be near enough to your torso so that your fingertips may touch your heels.
- When the exercise reaches its peak, firmly squeeze your glutes. In order to prevent your knees from splaying outward, your inner thighs should also be active.
- Keep your breathing regular and don’t hold your air. when you get your hips back on the floor
Neck Rotation Stretch
Instructions:
- Straighten your shoulders and maintain a neutral spine whether sitting or standing.
- As you hold for 15 to 30 seconds, notice how your neck expands on the back and sides.
- Repeat on the left side, walking slowly back to the middle.
- For each side, repeat two to three times.